Page definition
|
|
|

This section allows you to select the document template to be used (drwdot), as well as the number and positioning of views created for the first and subsequent pages. It is essential to define views on both pages, as all pages except the first are copies of the second page.
By clicking on the  A customized template can be used. This path can point to a network drive and is saved when the search icon is clicked again. The gray rectangle corresponds to the area defined (rectangle) in the template background.
Next, define the thumbnail groups in which the views will be created.
- Page 1 :
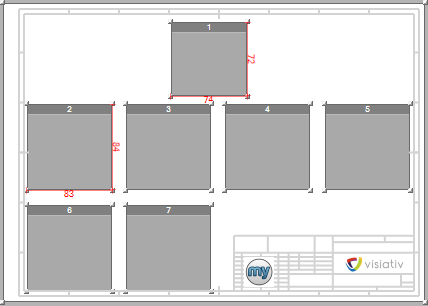
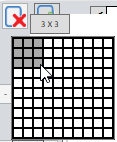
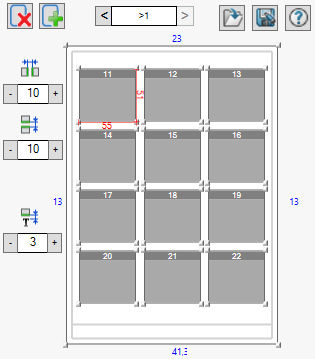
We're going to define 2 groups, the first consisting of a single square and the second of 9 squares. (3 columns x 3 rows).
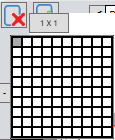
Click on the  then move the mouse cursor to select the number of squares, release the mouse on the desired number. A tooltip indicates the combination and the boxes are colored.
 -->
--> 
The group can be moved simply with the mouse  to position it in the frame.
To delete a group, select it (change color) then click on the  .
.
To delete one or more boxes, simply press the "Ctrl on the keyboard before clicking on the boxes, then click on the . You can use this feature if you want to optimize format filling by excluding an area occupied by the presence of a title block. Example of an A3 format with a title block.
|
|
|

Figures appear:
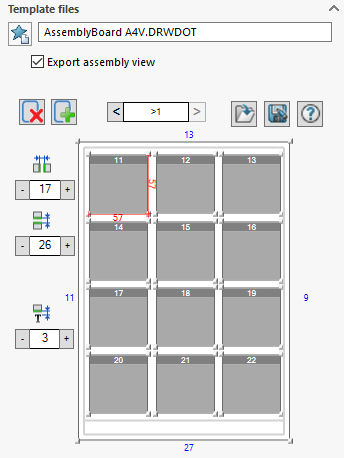
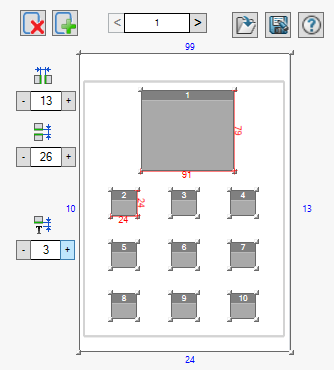
- The blue numbers indicate the position of the group in relation to the edge of the sheet; this value can be negative if the group is positioned outside the frame.
- Red numbers indicate thumbnail dimensions. You can resize the thumbnail by dragging the handles (corners) of the blue rectangle.
- The number inside indicates the view number to be created. This number corresponds to the first line of the BOM IF the option
 is NOT checked.
Click on the to define a new thumbnail group on page 1.
 -->
--> 
The selected group is shown in dark blue. You can resize all the thumbnails in this group by stretching the corner of one of the thumbnails.
Horizontal gap :  playing on the "+" or the "-" you can increase or decrease the horizontal distance between views.
Vertical Gap :  playing on the "+" or the "-" you can increase or decrease the vertical distance between views. Increase this gap if a large number of annotations are to be displayed below the thumbnails, so that they do not overlap the contents of the views.
Offset Annotation :  playing on the ''+'' or the "-" you can increase or decrease the minimum space between the bottom of the view and the annotation position (see example below).
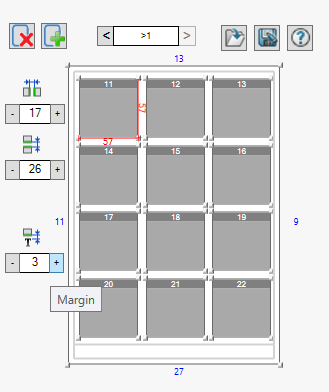
- Next page :
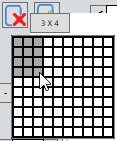
Views must be positioned. For the following pages, we'll define a single group of 12 boxes (3 columns x 4 rows).
Proceed in the same way as for the next page ">1".
Click on the to define a group of thumbnails for all subsequent pages.
 -->
--> 
Moving and positioning the group so that it is centered in relation to the frame defined in the model (drwdot) used.
To delete a group, select it (change color) then click on the .
To delete one or more boxes, simply press the "Ctrl on the keyboard before clicking on the boxes, then click on the . You can use this feature if you want to optimize format filling by excluding an area occupied by the presence of a cartridge.
|
|
|
Set the "Horizontal gap, "Vertical Gap and "Offset Annotation.
Annotations use the font defined in the options of the template (drwdot) used.
Here's the impact of changing the value of "Offset AnnotationA value of 0 means that the top of the annotation text is aligned with the bottom of the frame of the lowest view:
- With a 5 mm offset, annotations are positioned within the frame of the lowest view of each line.
 .
.
In this generated line, the frame of the lowest view is that of the "Tube support" part, so all annotations are positioned in relation to this view. Here, with the offset value set to 5 mm, the text is 5 mm above the bottom of the frame.
- With a negative offset of -5 mm, annotations are positioned outside the frame of the lowest view of each line.
 .
.
This time the annotations are all positioned 5mm below the bottom of the "Tube support" part view frame.
 But with a negative value, annotations may overlap the views on the next line.
As a rule, this offset is set once and for all. The value is stored and retained each time the tool is launched. AssemblyBoard.
These layouts can be saved for reuse in other layouts  .
.